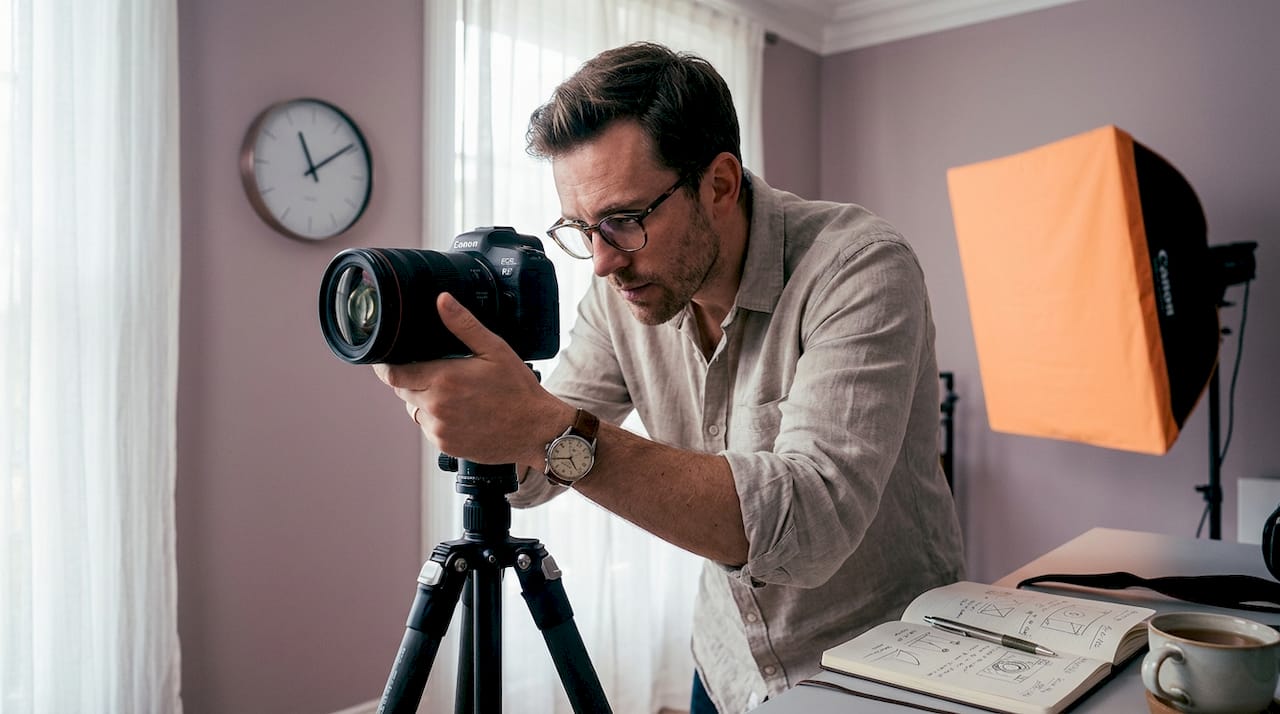
Lighting can make or break a business portrait. Get it right and you look confident, approachable, and credible. Get it wrong and even the most polished professional looks tired or untrustworthy. The good news? Business portrait lighting explained in its simplest form is not complicated. Most photographers and business professionals assume you need a room full of expensive gear to get great results. You really don’t. A single well-placed light covers the vast majority of situations. This guide walks you through everything you need to know, from basic setups to the classic patterns pros rely on every day.
Business portrait lighting explained: the basics
Before you start worrying about fancy gear, it helps to understand what each light actually does. Portrait photographers often talk about a three-point lighting system, which is just an industry term for three distinct light sources working together. Each one has a specific job.
The core pieces of kit are:
- Key light. This is your main light source and the most important one. It sets the overall look, direction, and mood of the image. Position it roughly 45 degrees to the side of your subject and slightly above eye level for the classic professional result.
- Fill light. This softens the shadows created by your key light. Without it, one side of the face can look too dark. Fill light intensity is typically set to 50–75% of the key light brightness to preserve natural contrast without flattening the image.
- Rim or hair light. Placed behind the subject and out of frame, this separates your subject from the background, giving a clean, polished finish.
- Modifiers. These are the tools you attach to lights to shape them. Softboxes, umbrellas, and reflectors all change how light behaves. Bigger modifier, softer light. Closer to the subject, softer the result.
One thing that trips people up early on is thinking diffusion alone creates soft light. It doesn’t. Softness depends on apparent size relative to the subject. A large softbox placed far away can still produce harsh shadows. The golden rule here is straightforward: the larger and closer the light source, the softer and more flattering the result.
Pro Tip: Start with a single large softbox close to your subject before adding any other lights. Master that first. Everything else is a refinement, not a requirement.
For camera settings, most studio portrait photographers shoot at ISO 100, a shutter speed around 1/125s, and an aperture between f/5.6 and f/8. These settings keep your image sharp, reduce ambient light influence, and give you a controllable depth of field.
Classic lighting patterns for business portraits
This is where portrait photography gets genuinely interesting. There are four classic lighting patterns used by professionals, and each one creates a distinct mood. Knowing when to use each one is the real skill.
Rembrandt lighting is named after the Dutch painter. Its hallmark is a small triangle of light on the shadow-side cheek, formed when the shadow from the nose just touches the shadow from the cheek. The key light sits at 45–60 degrees to the side and slightly above eye level. It creates depth and gravitas, making it popular for senior executives and leadership portraits. It does require careful attention to nose shadow length and catchlight placement to keep the eyes alive.
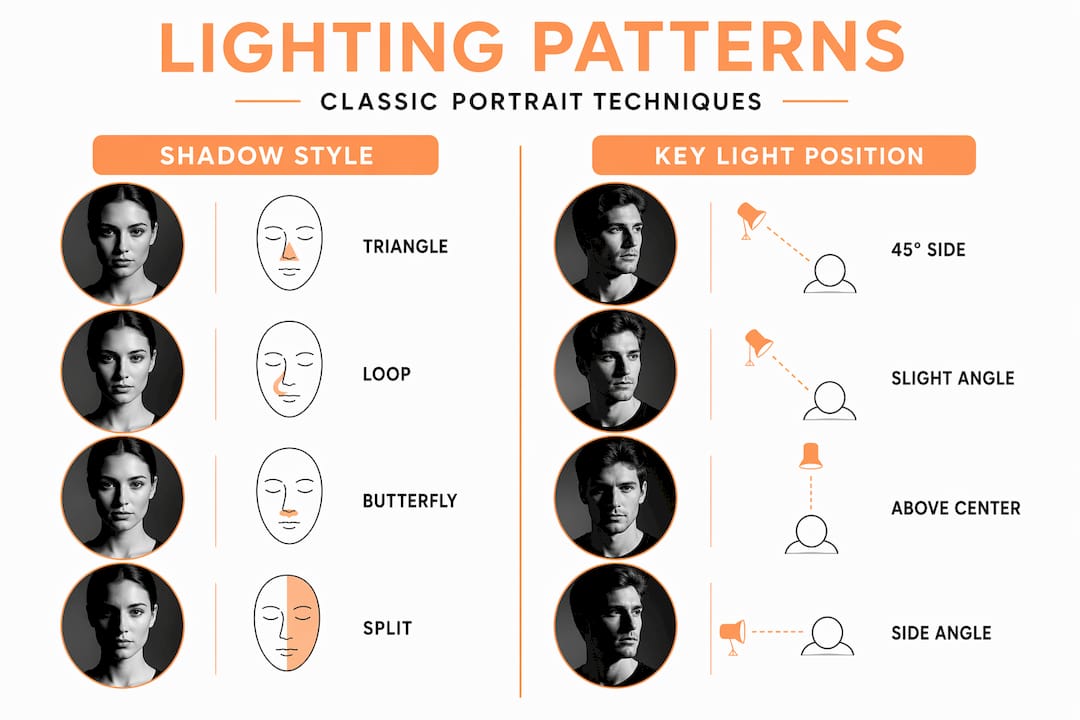
Loop lighting is probably the most commonly used pattern in professional business photography. The key light moves slightly closer to the camera axis than with Rembrandt, creating a small shadow that loops downward from the nose. It’s flattering on most faces, not overly dramatic, and works beautifully for LinkedIn headshots, corporate portraits, and team photos.
Butterfly lighting (also called Paramount lighting) places the key light directly in front of the subject and above eye level. The shadow falls straight under the nose like a butterfly shape. It’s clean and glamorous, often used in high-end corporate work and personal branding imagery. A reflector placed below the face creates a clamshell effect that softens wrinkles and brightens tired eyes beautifully.
Split lighting divides the face exactly in half, with one side fully lit and the other in shadow. It’s bold and dramatic, rarely used for standard business portraits, but very effective for creative professionals or personal brand imagery where character is more important than convention.
| Lighting pattern | Key light position | Shadow style | Best for |
|---|---|---|---|
| Rembrandt | 45–60° side, above eye | Triangle on cheek | Senior executives, dramatic portraits |
| Loop | 30–45° side, above eye | Short loop under nose | Everyday business, LinkedIn headshots |
| Butterfly | Directly in front, above eye | Under nose | Personal branding, clean corporate |
| Split | 90° directly to side | Half face in shadow | Creative professionals, bold headshots |
Pro Tip: Check for catchlights in your subject’s eyes before you shoot anything. Catchlights in eyes are what make a portrait feel alive. The light should appear as a small, bright reflection at roughly the 10 or 2 o’clock position in each pupil.
One-light setups and when to add more
Here’s something that surprises a lot of people. A single high-quality light source handles around 90% of business portraits with soft, flattering results. You don’t need a complex multi-light studio rig for most professional headshots.
A good starting point is a 3-foot octabox placed roughly 3 feet from the subject’s face. That distance-to-size relationship is what creates genuinely soft, wrapping light. Move it further away and the light hardens noticeably. Add a simple white reflector on the opposite side to bounce some light back into the shadows and you have a setup that produces clean, professional results consistently.
The main challenges with a single light come down to these situations:
- Subject blending into the background. If your subject has dark hair or is wearing dark clothing against a dark background, a one-light setup can make them disappear into the frame.
- Flat backgrounds. Without separate illumination, grey or white backgrounds often look muddy and lack depth.
- Strong shadow detail. Some faces or lighting angles produce shadows that are too deep for a business context without a fill source.
This is when a second light earns its place. A rim or hair light placed behind the subject, hidden from the camera, adds a subtle edge of light that separates the subject cleanly from the background. It’s a small addition with a big visual impact. Keep it subtle. If you can immediately see the rim light in the image, it’s probably too bright.
Background lighting adds professional depth using small lights with grids to create gradients or halos. This controls light spill and gives the finished portrait a high-end, three-dimensional feel that clients immediately notice. For anyone looking at their headshot backgrounds guide, the background light is often the missing piece between a competent photo and a genuinely polished one.
Advanced lighting control for skin, contrast, and background
Once you understand the basics, the real craft in business portrait lighting is about refinement. Small adjustments to contrast, modifier choice, and reflector type can completely change how someone looks on camera.
Contrast ratios are a useful way to think about shadow depth. A ratio of 2:1 means the key light side of the face is twice as bright as the shadow side, which produces a natural, conversational look. A 4:1 ratio creates more drama and depth. For most business headshots, you want to stay in that 2:1 to 4:1 range. Go beyond that and the image starts to look more cinematic than professional.
Skin tone is an area many photographers handle inconsistently. Here is a simple approach:
- Fair skin tones respond well to white reflectors and diffused softboxes. They hold highlight detail well, so you have more flexibility.
- Deeper skin tones benefit from silver reflectors rather than white ones. Silver adds more specular punch to highlights, preventing skin from appearing ashy or flat.
- Mid-range tones are usually the most forgiving, though warmer ambient light from tungsten or warm-balanced LEDs can look beautiful if your subject has olive or warm undertones.
Subjects wearing glasses are a classic challenge. The solution is to angle the glasses slightly downward at the temples (tilt the frames forward just a touch) or shift the key light slightly higher to move the reflection off the lens. Both approaches work. Moving the key light is usually faster.
Pro Tip: Post-processing should complement your lighting, not correct it. If you’re spending a long time fixing shadows or highlights in editing, the lighting was off in the first place. Get consistent illumination near eye level and predictable setups as your standard, and retouching becomes a light finishing touch rather than a rescue job.
Posing, coaching, and getting the most from your setup
Great lighting and a poorly posed subject still produces a poor portrait. The two work together and this is something photographers and business professionals both need to understand.
Here is a practical sequence for coaching subjects into a great lit portrait:
- Set your lighting first, then bring the subject in. Adjusting lights around a seated subject is awkward and wastes time. Test your exposure on a stand-in first.
- Ask the subject to push their chin slightly forward and down. This is often called the “turtle” technique and it defines the jawline and eliminates double chin issues. It feels unnatural to do but looks excellent on camera.
- Turn the face toward the key light, not away. Most flattering lighting patterns work with the face slightly angled toward the main source. Turning away increases shadow and drama, which is rarely what corporate clients want.
- Check the catchlights before every set of shots. Lowering or moving the light closer increases eye sparkle. Flat, lifeless eyes are often a lighting position issue, not a subject expression issue.
- Brief the subject on wardrobe. Busy patterns, fine pinstripes, and highly reflective fabrics all create problems under studio lighting. Plain, mid-tone colours photograph cleanly and keep the focus on the face.
The three-point system’s real strength is explicit shadow control: key for baseline exposure, fill to soften, and backlight for subject separation. But all of that falls apart if the subject is slouching, turning the wrong way, or wearing a reflective shirt. Coaching is as much part of the photographer’s job as adjusting power ratios.
My honest take on getting portrait lighting right
I’ll be straight with you. When I started shooting business portraits seriously, I thought more lights meant better images. I was wrong. I spent months overcomplicating setups that a single well-placed octabox would have handled better.
The photographers I respect most are the ones who can walk into a space with a single strobe and a reflector and produce portraits that look like they came from a fully kitted studio. That skill comes from understanding light, not from owning more of it.
What I’ve noticed in my own work is that the biggest improvements rarely come from adding gear. They come from paying closer attention to small things. Where is the shadow falling on the nose? Is there a catchlight? Is the subject’s chin where it needs to be? These are the details that separate a technically correct portrait from one that genuinely flatters someone and builds their confidence in the image.
I also think photographers underestimate how much coaching matters. You can have the most beautifully designed three-light setup in London and still produce a stiff, awkward portrait if your subject feels uncomfortable. Getting someone relaxed, explaining what you’re doing, and making the session feel enjoyable produces better images than any modifier upgrade ever will.
My advice is this: master loop lighting with a single softbox until you can set it up in under five minutes and nail the exposure first time. Then build from there.
— Emmet
Get professionally lit business portraits at Lemonsharkstudio
If you’ve read this far and want to see these techniques applied by someone who’s spent years refining them, Lemonsharkstudio in Fulham, West London offers professional headshot sessions for corporate professionals, executives, creatives, and personal branding clients.

The studio is set up for consistent, flattering portrait lighting with modifiers, background options, and a relaxed environment that makes a real difference to how people present on camera. Whether you’re refreshing your LinkedIn profile, building a personal brand, or shooting a full team, the sessions are tailored to you. Take a look at the studio setup and packages and book your session directly. You can also read the full guide to a headshot session to know exactly what to expect before you arrive.
FAQ
What is the best lighting setup for business portraits?
A single large softbox, such as a 3-foot octabox placed roughly 3 feet from the subject’s face, covers the majority of business portrait situations with soft, flattering light. Adding a reflector for fill and a rim light for separation rounds out a complete professional setup.
What lighting pattern is used most for corporate headshots?
Loop lighting is the most widely used pattern for business and corporate headshots. It creates a natural, approachable look by casting a small shadow that loops downward from the nose, and it flatters most face shapes without adding unnecessary drama.
How do I stop glasses creating reflections in a portrait?
Tilt the front of the glasses slightly downward at the temples, or raise the key light so the reflection moves outside the lens area. Both approaches work, and shifting the light is usually the quicker fix on a live shoot.
Does lighting really matter that much for a business photo?
Yes. Lighting affects how credible, approachable, and confident a subject looks in a portrait. Standardising illumination near eye level and using consistent setups also improves brand recognition across team or company headshots.
What contrast ratio works best for business portraits?
A contrast ratio of 2:1 to 4:1 is the standard for business portraits. This range produces natural shadow depth that adds dimension to the face without looking overly dramatic or cinematic.